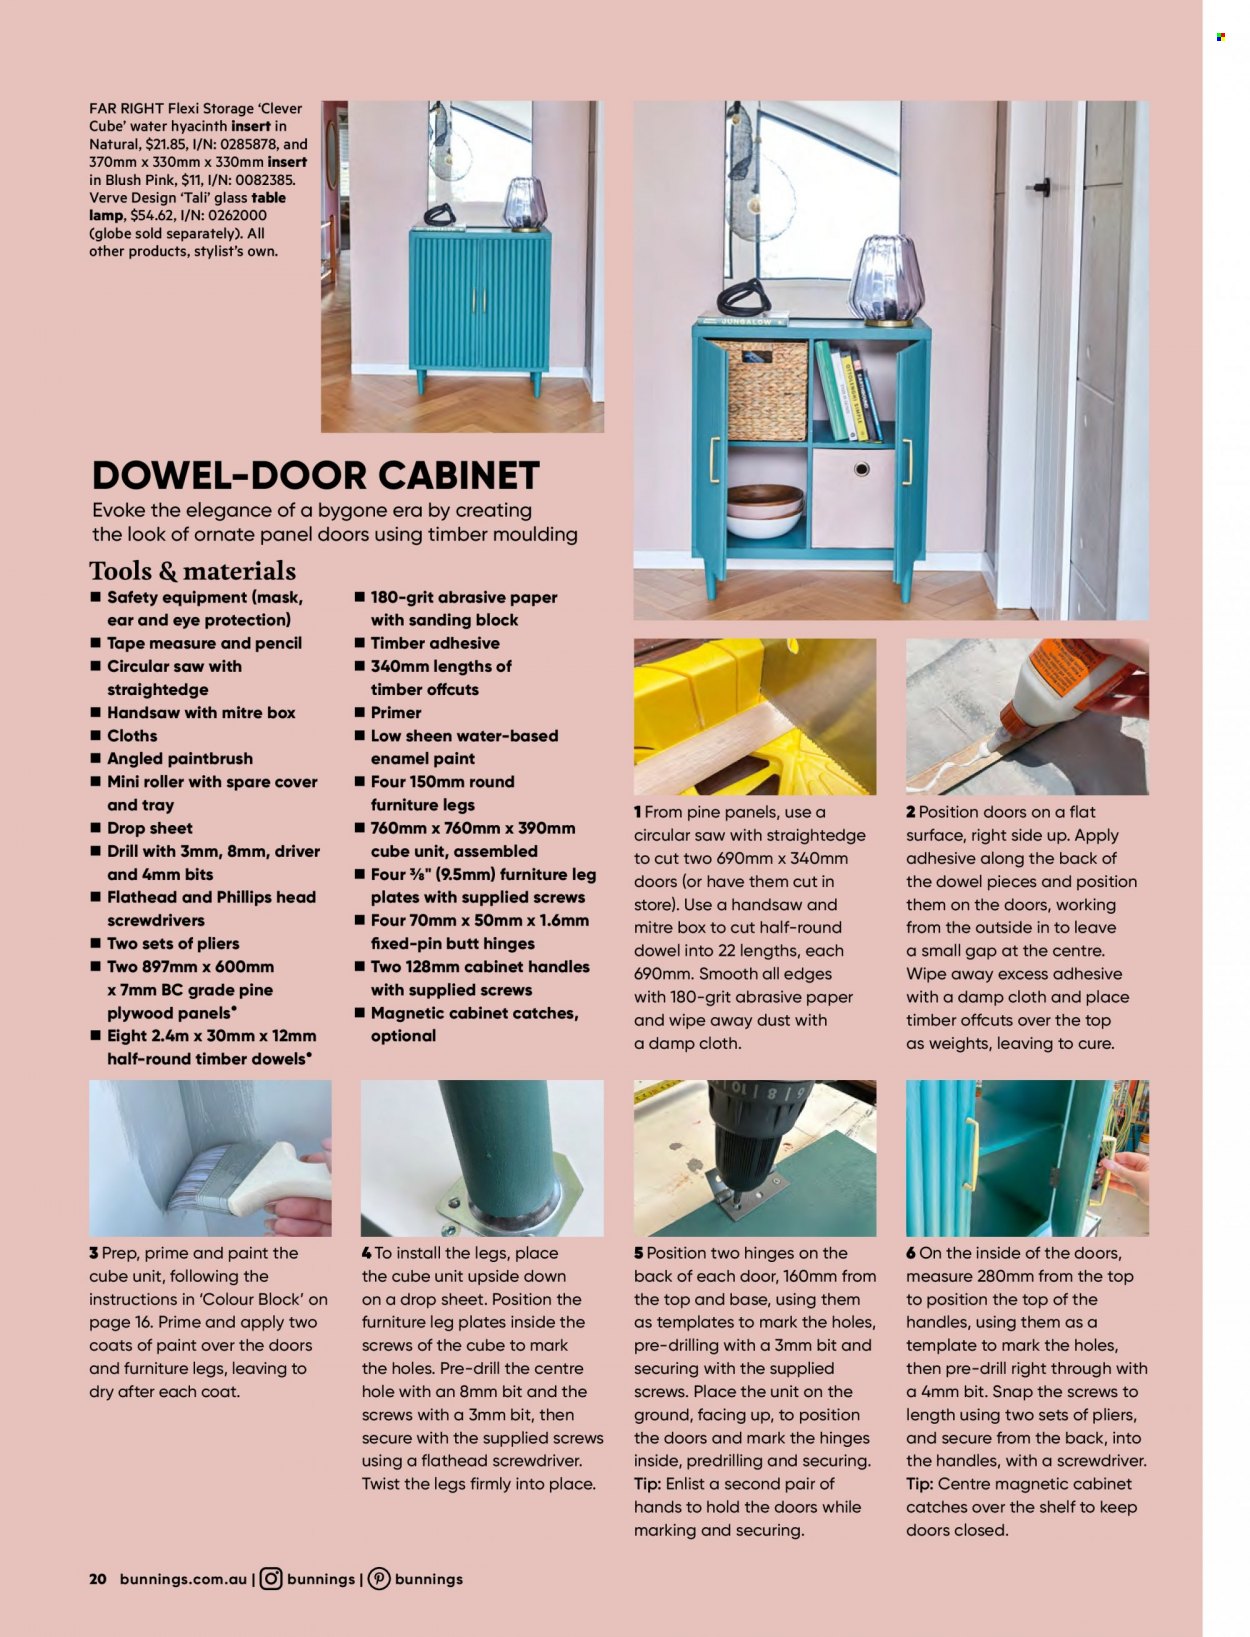
FAR RIGHT Flexi Storage ‘Clever
Cube’ water hyacinth insert in
Natural, $21.85, I/N: 0285878, and
370mm x 330mm x 330mm insert
in Blush Pink, $11, I/N: 0082385.
Verve Design ‘Tali’ glass table
lamp, $54.62, I/N: 0262000
(globe sold separately). All
other products, stylist’s own.
DOWEL-DOOR CABINET
Evoke the elegance of a bygone era by creating
the look of ornate panel doors using timber moulding
Tools & materials
nS
� afety equipment (mask,
ear and eye protection)
n �Tape measure and pencil
n �Circular saw with
straightedge
n �Handsaw with mitre box
n �Cloths
n �Angled paintbrush
n �Mini roller with spare cover
and tray
n �Drop sheet
n �Drill with 3mm, 8mm, driver
and 4mm bits
n �Flathead and Phillips head
screwdrivers
n �Two sets of pliers
n �Two 897mm x 600mm
x 7mm BC grade pine
plywood panels•
n �Eight 2.4m x 30mm x 12mm
half-round timber dowels•
3 Prep, prime and paint the
cube unit, following the
instructions in ‘Colour Block’ on
page 16. Prime and apply two
coats of paint over the doors
and furniture legs, leaving to
dry after each coat.
20 bunnings.com.au |
n 1� 80-grit abrasive paper
with sanding block
n �Timber adhesive
n �340mm lengths of
timber offcuts
n �Primer
n �Low sheen water-based
enamel paint
n �Four 150mm round
furniture legs
n �760mm x 760mm x 390mm
cube unit, assembled
n �Four ⅜" (9.5mm) furniture leg
plates with supplied screws
n �Four 70mm x 50mm x 1.6mm
fixed-pin butt hinges
n �Two 128mm cabinet handles
with supplied screws
n �Magnetic cabinet catches,
optional
4 To install the legs, place
the cube unit upside down
on a drop sheet. Position the
furniture leg plates inside the
screws of the cube to mark
the holes. Pre-drill the centre
hole with an 8mm bit and the
screws with a 3mm bit, then
secure with the supplied screws
using a flathead screwdriver.
Twist the legs firmly into place.
bunnings |
bunnings
1 From pine panels, use a
circular saw with straightedge
to cut two 690mm x 340mm
doors (or have them cut in
store). Use a handsaw and
mitre box to cut half-round
dowel into 22 lengths, each
690mm. Smooth all edges
with 180-grit abrasive paper
and wipe away dust with
a damp cloth.
2 Position doors on a flat
surface, right side up. Apply
adhesive along the back of
the dowel pieces and position
them on the doors, working
from the outside in to leave
a small gap at the centre.
Wipe away excess adhesive
with a damp cloth and place
timber offcuts over the top
as weights, leaving to cure.
5 Position two hinges on the
back of each door, 160mm from
the top and base, using them
as templates to mark the holes,
pre-drilling with a 3mm bit and
securing with the supplied
screws. Place the unit on the
ground, facing up, to position
the doors and mark the hinges
inside, predrilling and securing.
Tip: Enlist a second pair of
hands to hold the doors while
marking and securing.
6 On the inside of the doors,
measure 280mm from the top
to position the top of the
handles, using them as a
template to mark the holes,
then pre-drill right through with
a 4mm bit. Snap the screws to
length using two sets of pliers,
and secure from the back, into
the handles, with a screwdriver.
Tip: Centre magnetic cabinet
catches over the shelf to keep
doors closed.