61
Make it
Three easy projects
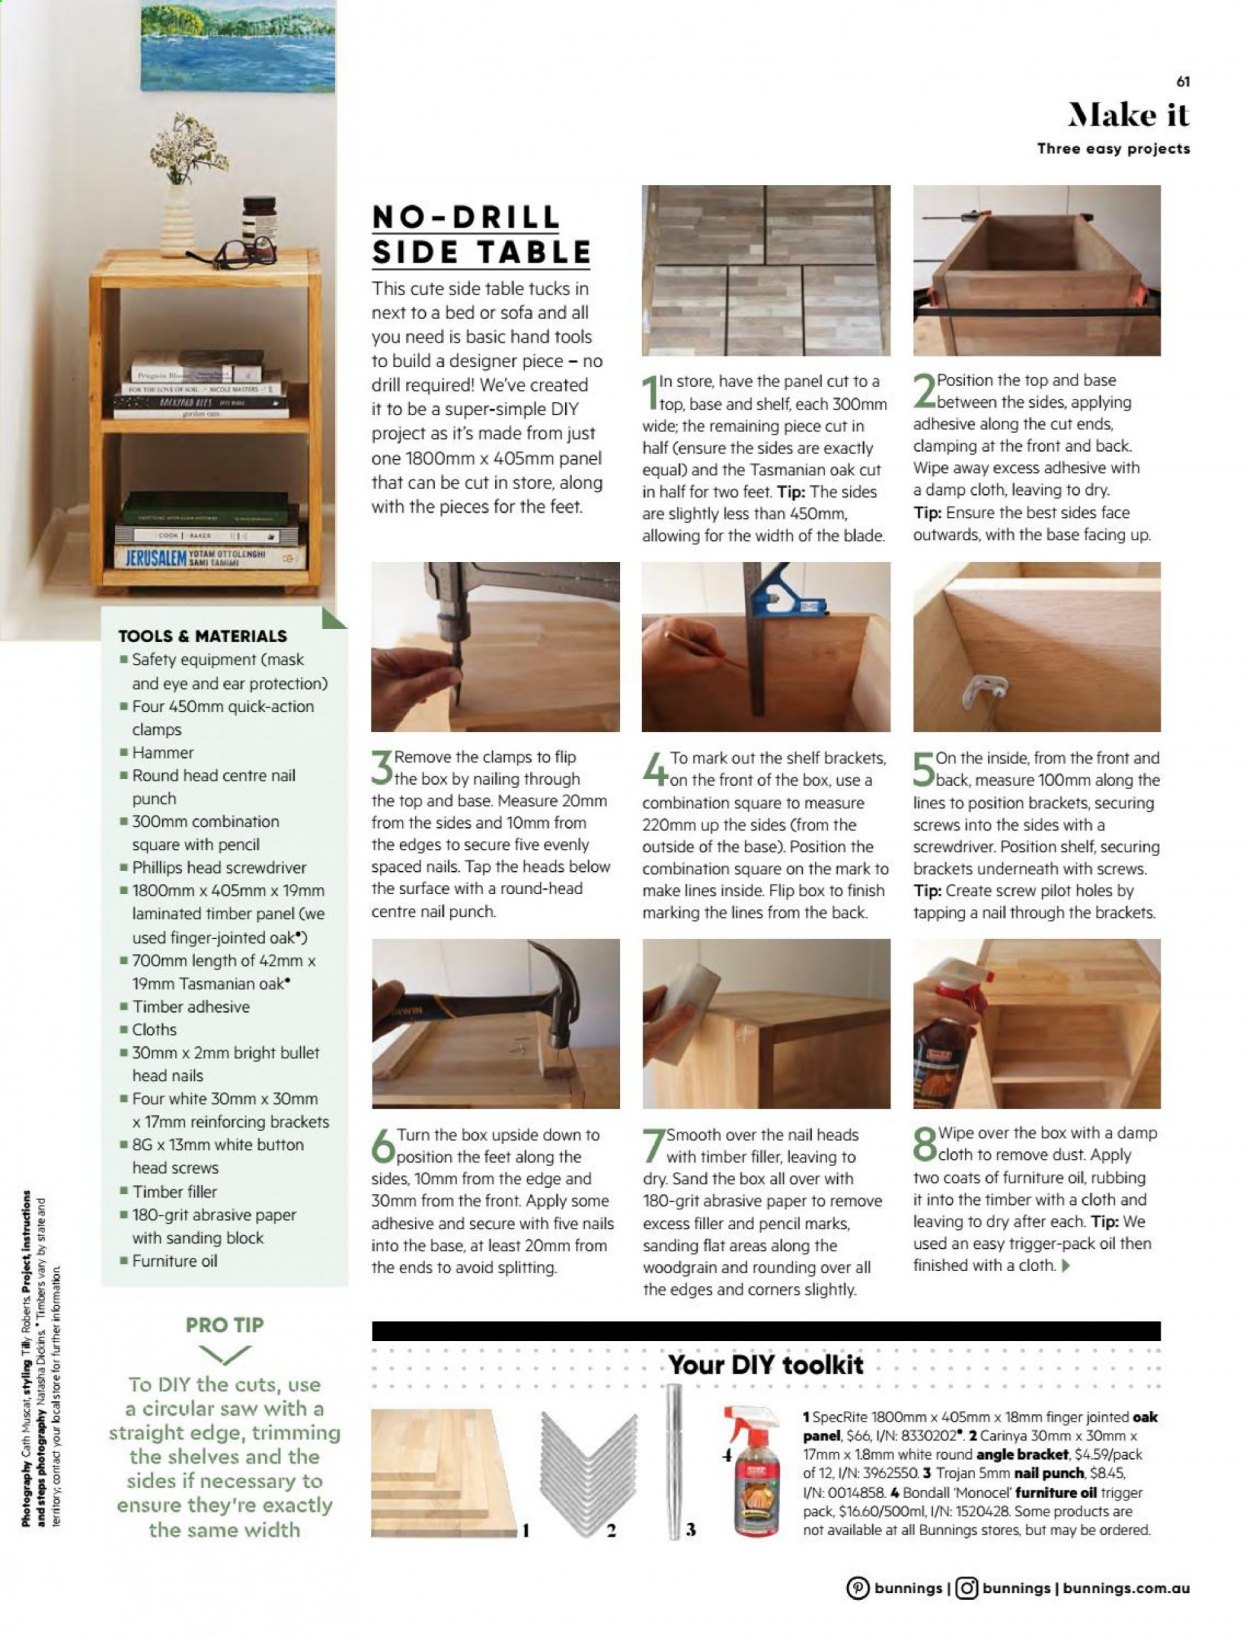
NO-DRILL
SIDE TABLE
This cute side table tucks in
next to a bed or sofa and all
you need is basic hand tools
to build a designer piece - no
drill required! We've created
it to be a super-simple DIY
project as it's made from just
one 1800mm x 405mm panel
that can be cut in store, along
with the pieces for the feet.
gin B
In store, have the panel cut to a
top, base and shelf, each 300mm
wide; the remaining piece cut in
half (ensure the sides are exactly
equal) and the Tasmanian oak cut
in half for two feet. Tip: The sides
are slightly less than 450mm,
allowing for the width of the blade.
Position the top and base
Zbetween the sides, applying
FOR FIRE LOVEOF SOIL COLE MASTERSE
adhesive along the cut ends,
clamping at the front and back.
Wipe away excess adhesive with
a damp cloth, leaving to dry.
Tip: Ensure the best sides face
outwards, with the base facing up.
1wwT C e
COOK AKES
JERUSALEM YOTAM OTTOLENGHI
SAMI TAMIMI
TOOLS & MATERIALS
Safety equipment (mask
and eye and ear protection)
Four 450mm quick-action
clamps
Hammer
Remove the clamps to flip
Sthe box by nailing through
To mark out the shelf brackets,
4on the front of the box, use a
On the inside, from the front and
Oback, measure 100mm along the
Round head centre nail
punch
the top and base. Measure 20mm
combination square to measure
220mm up the sides (from the
outside of the base). Position the
combination square on the mark to
make lines inside. Flip box to finish
marking the lines from the back.
lines to position brackets, securing
- 300mm combination
from the sides and 10mm from
screws into the sides with a
square with pencil
Phillips head screwdriver
the edges to secure five evenly
spaced nails. Tap the heads below
screwdriver. Position shelf, securing
brackets underneath with screws.
the surface with a round-head
Tip: Create screw pilot holes by
tapping a nail through the brackets.
1 1800mm x 405mm x 19mm
laminated timber panel (we
centre nail punch.
used finger-jointed oak")
1 700mm length of 42mm x
19mm Tasmanian oak
Timber adhesive
HIM
- Cloths
30mm x 2mm bright bullet
head nails
Four white 30mm x 30mm
x 17mm reinforcing brackets
Wipe over the box with a damp
Ocloth to remove dust. Apply
Turn the box upside down to
position the feet along the
sides, 10mm from the edge and
30mm from the front. Apply some
Smooth over the nail heads
1 8G x 13mm white button
I with timber filler, leaving to
dry. Sand the box all over with
180-grit abrasive paper to remove
excess filler and pencil marks,
sanding flat areas along the
woodgrain and rounding over all
the edges and corners slightly.
head screws
two coats of furniture oil, rubbing
Timber filler
it into the timber with a cloth and
1 180-grit abrasive paper
leaving to dry after each. Tip: We
used an easy trigger-pack oil then
adhesive and secure with five nails
with sanding block
into the base, at least 20mm from
Furniture oil
the ends to avoid splitting.
finished with a cloth.
PRO TIP
Your DIY toolkit
To DIY the cuts, use
a circular saw with a
straight edge, trimming
the shelves and the
sides if necessary to
ensure they're exactly
the same width
1 SpecRite 1800mm x 405mm x 18mm finger jointed oak
panel, $66, I/N: 8330202°. 2 Carinya 30mm x 30mm x
17mm x 1.8mm white round angle bracket, $4.59/pack
of 12, 1/N: 3962550. 3 Trojan 5mm nail punch, $8.45,
I/N: 0014858. 4 Bondall Monocel' furniture oil trigger
pack, $16.60/500ml, I/N: 1520428. Some products are
not available at all Bunnings stores, but may be ordered.
3
bunnings | O bunnings | bunnings.com.au
Photography Cath Muscat, styling Tilly Roberts Project, instructions
and steps photography Natasha Dickins Timbers vary by state and
territory, contact your localstore for further information